Go to Admin > Settings > Data > Import > Select New Data > Add Inventory
Do you want to Add or Update a few Items?
If you are receiving a new shipment of product from a supplier or you want to add just a few items, it is much easier to manually add it. For instructions click here.
What is Inventory?
Inventory is the stock levels you have of each herb, premix formula or product. It ONLY deals with how much you have of everything and tracks how you dispense it. For more information on Inventory, click here.
Bulk Upload Inventory & Lots
This section explains how to add inventory/stock levels to your dispensary by uploading it in BULK. .Generally when you first start your dispensary, its easier to upload your current stock levels all at once, instead of adding it one by one.
When you upload your inventory quantity/stock levels, the system needs to know which herb, premix formula or product to add the inventory to. Each item in your dispensary has a unique ID associated with, which needs to be included in the upload file. For this reason, we have created an easy way to automatically create the file for you and all you need to do is add the lot number and quantity to the file.
Steps to Bulk Upload Inventory Amounts
Step 1 - Create a CSV Upload File

Go to Admin > Settings > Data > Import > Select New Data > Add Inventory
Select which item you want to upload, Premix Formulas, Products, Single Herbs or you can download All
Choose the Ingredient Type
Choose the Name Type
Press Download
Step 2 - Fill out CSV/Excel File
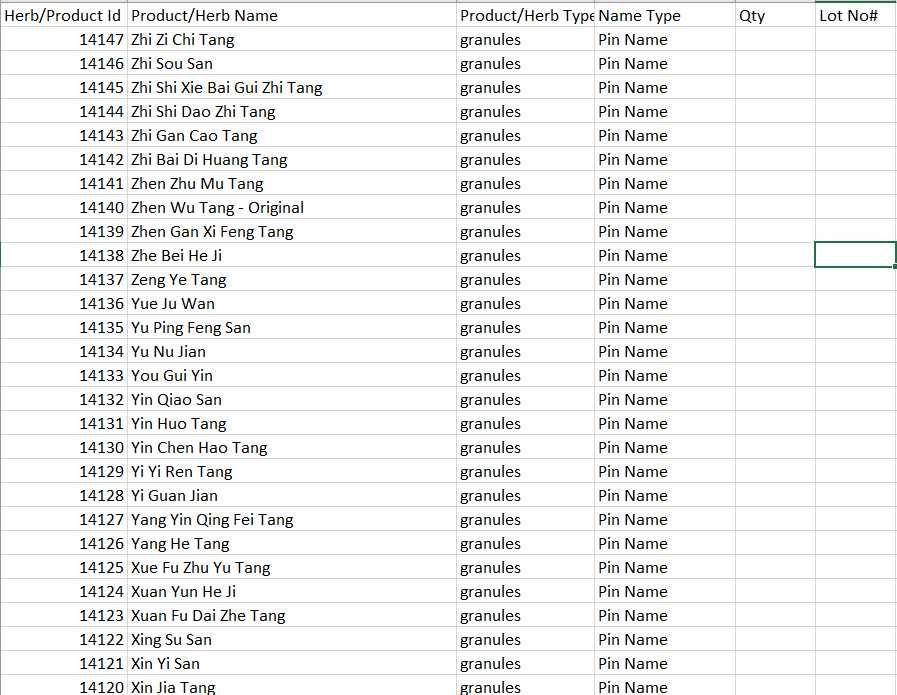
Open up the CSV file you just created and it will look similar to the example below.
Column A shows you the item ID, which has been generated by the system. Do not change this number and always ensure the product associated with this number stays constant. If you need to sort the excel columns, make sure you sort all the columns and not just one, or you will add stock amounts to the wrong item.
1. Enter the Qty per Item you have on hand
2. Enter the Lot# for the item. If you do not have a lot number, you will need to make one up or it will not import properly.
3. If you have more than one lot number for an item, duplicate the row contents, ensuring the ID is the same, and enter the qty and lot number for the second lot.

Remove Blank Rows
If there are items in the spreadsheet that do not have a qty, you need to remove these rows from your CSV sheet before you upload it. The system will not allow items to be uploaded that do not have a quantity or lot number.
Upload CSV File
Go to Admin > Settings > Data > Import New Data > Add Inventory
where it says “Upload CSV File” select the button “Choose File” and find the saved file on your computer.
Review Data
The system will analyze your CSV file to ensure all the required information is there, and that all the ID’s exist in the system. If everything is good, the screen will look completely white, and the “Confirm and Upload” green button will be shown at the BOTTOM of the screen. Make sure you scroll to the bottom.
Click on “Confirm and Upload” and your data will be uploaded.
Check Data is Accurate
You can check that the data was uploaded by going to Admin > Inventory > Inventory Levels
You can also check that the data was uploaded by going to Admin > Inventory > Inventory History

